


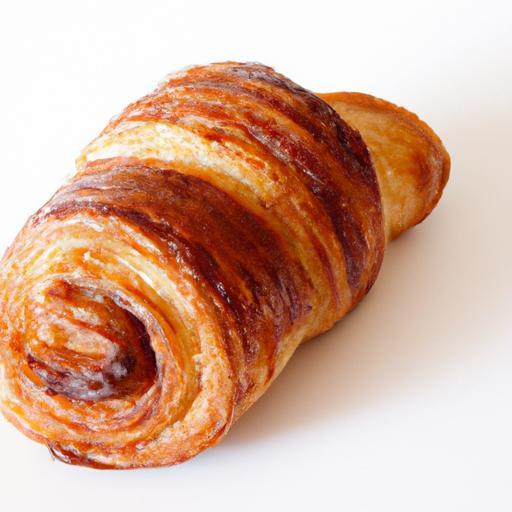
Ther’s something undeniably magical about biting into a perfectly flaky, buttery Pain au Chocolat-the delicate layers yielding to a luscious ribbon of rich, dark chocolate. this beloved French pastry, a harmonious dance of texture and flavor, has enchanted taste buds around the world. But beyond its tempting exterior lies a craft that, once understood, can transform your kitchen into a patisserie of your own making. In this article,we will guide you step-by-step through mastering the art of pain au Chocolat,unlocking the secrets behind its tender crumb,golden crust,and decadent filling. Prepare to embark on a culinary journey where patience meets precision,and your efforts culminate in a pastry that’s as notable as it is irresistible.
Master the Art of Pain au Chocolat begins wiht selecting the finest quality ingredients, for each component plays a crucial role in crafting these flaky, buttery delights that hold a luscious chocolate core. This iconic French pastry calls for precision, patience, and the best raw materials to capture the essence of a perfect morning treat or afternoon indulgence.
Prep and Cook Time
- Planning: 4 hours (including chilling and resting times)
- Active hands-on time: 1 hour 15 minutes
- Baking time: 15-20 minutes
Yield
Yields approximately 12 classic-sized pain au chocolat, perfect for sharing or savoring with coffee.
Difficulty Level
Advanced: This recipe involves mastering laminated dough techniques that require precision and timing for optimal layers and texture.
Ingredients
- For the Dough:
- 4 cups (500g) all-purpose flour, sifted
- 1/4 cup (50g) granulated sugar
- 2 tsp fine sea salt
- 1 tbsp instant dry yeast
- 1 1/4 cups (300ml) whole milk, warmed (about 95°F/35°C)
- 3 tbsp unsalted butter, softened
- For the Butter Block:
- 1 1/4 cups (285g) unsalted European-style butter, cold and cut into a 7×7 inch square
- For the Filling:
- 12 sticks of high-quality dark chocolate batons or couverture chocolate, approx. 3 inches long
- For Egg Wash:
- 1 large egg, beaten with 1 tbsp milk
Instructions
- Activate and mix the dough: In a stand mixer bowl, combine warm milk, yeast, and sugar. Let it bloom 5-7 minutes, until frothy. Add flour, salt, and softened butter. Mix with dough hook on low for 3 minutes, than medium speed for 7 minutes until smooth and elastic.
- First rest: Shape dough into a ball, cover with plastic wrap, and refrigerate for 1 hour. this resting period allows gluten relaxation, making lamination smoother.
- Prepare butter block: On a cold surface, shape cold butter into a perfect square wrapped in parchment paper, keeping edges sharp. Chill if too soft.
- Laminate the dough: Roll dough into a 16×16 inch square, place butter block diagonally on the center, folding dough corners over like an envelope. Press edges to seal, avoiding butter leakage. Roll out gently to 8×24 inches rectangle.
- Perform first fold: Fold the dough into thirds (like a letter). Wrap in plastic wrap and chill for 30 minutes.
- Second and third folds: Repeat rolling and folding process twice more, chilling between each fold for 30 minutes to maintain butter-solid layers, ensuring the signature flaky texture.
- Final dough roll-out: After the last rest, roll dough to about 1/4 inch thick and cut into 3×5 inch rectangles.
- Shape and fill: Place one chocolate baton near the shorter edge of each rectangle. Roll tightly, sealing edges with a little water.Position seam side down on baking trays lined with parchment.
- Proof: Cover loose with cling film and proof at 75°F (24°C) for 1.5 to 2 hours until puffed but not over-proofed.
- Egg wash and bake: Brush gently with egg wash for that golden, glossy finish. Bake on the middle rack of a preheated 400°F (200°C) oven for 15-20 minutes until golden brown and flaky.
- Cool slightly before serving: Remove from oven and cool on racks for 10 minutes to let layers set, then enjoy fresh and warm or at room temperature.
Tips for Success
- Use European-style butter with higher fat content for richer flavor and better lamination.
- If you don’t have a stand mixer, knead the dough by hand until smooth but avoid overworking.
- Keep all tools and surfaces cold to prevent melting butter during lamination.
- If chocolate batons are unavailable,chop quality dark chocolate into small sticks with a sharp knife.
- wrap any unused dough tightly and freeze for up to 2 weeks – thaw slowly in the fridge before use.
- For a lighter texture, allow proofing in a warm, humid environment (e.g., oven with a pan of hot water).
- Brush pastry gently with egg wash to avoid deflating delicate layers.
Serving suggestions
Serve your pain au chocolat warm for that irresistible, gooey chocolate center surrounded by crisp, buttery layers. Pair with a freshly brewed café au lait or a rich hot chocolate for a classic Parisian breakfast experience.
For elegant presentation, dust with a light sprinkle of powdered sugar or add fresh raspberries and a sprig of mint on the plate to brighten the scene. A small ramekin of vanilla crème anglaise or café caramel sauce on the side elevates this decadent pastry for afternoon tea gatherings or special brunches.

| Nutrient | Per Serving |
|---|---|
| Calories | 320 kcal |
| Protein | 5 g |
| Carbohydrates | 30 g |
| Fat | 18 g |
For more tips on flawless laminated pastries, check out our croissant-making guide and enhance your baking journey. For the science behind butter lamination and yeast interaction, King Arthur Baking Company offers excellent insights and techniques to deepen your understanding.
Q&A
Q&A: Master the Art of Pain au Chocolat – A Step-by-Step Recipe
Q1: What exactly is a pain au chocolat?
A1: Pain au chocolat, often dubbed the “chocolate croissant” by pastry lovers, is a flaky, buttery French pastry filled with luscious dark chocolate. With its golden layers and irresistible aroma, it’s the perfect harmony of crisp and melt-in-your-mouth softness.
Q2: Why is mastering pain au chocolat considered an art?
A2: Because creating that perfect balance of flaky pastry and rich chocolate requires precision, patience, and technique. The art lies in folding the dough just right (lamination), achieving the ideal butter-to-dough layers, and timing the proofing and baking impeccably.
Q3: What are the essential ingredients for an authentic pain au chocolat?
A3: You’ll need high-quality all-purpose flour, unsalted butter (preferably European-style for richness), fresh yeast (or instant yeast), sugar, salt, milk, eggs, and-of course-good quality dark chocolate batons or sticks.
Q4: Can you briefly describe the lamination process?
A4: Lamination is the magical folding and rolling technique that creates those signature flaky layers. You encase a block of cold butter into your dough,then fold and roll it multiple times,chilling between folds,allowing the butter to create dozens of thin,flaky layers.
Q5: How long does the entire pain au chocolat making process take?
A5: It requires patience-typically 1.5 to 2 days. This includes making the dough,resting,lamination (which involves several folds spaced out with chilling periods),shaping,proofing,and finally baking. The waiting pays off with heavenly results!
Q6: Any tips for shaping the pain au chocolat properly?
A6: Absolutely! after rolling your laminated dough into a rectangle,cut it into uniform pieces. Place a chocolate baton near one end, then roll the dough tightly but gently around it.Seal the edges to prevent chocolate leakage and maintain those neat golden rolls.
Q7: How should pain au chocolat be baked?
A7: Bake in a preheated oven at about 375°F (190°C) for 15-20 minutes, until the pastries are puffed and golden brown.An egg wash before baking adds that glossy, irresistible sheen.
Q8: What’s the best way to enjoy freshly baked pain au chocolat?
A8: Fresh from the oven is divine-warm, flaky, and gooey. Pair it with a café au lait or your favourite morning brew. For later indulgence, gently reheat in the oven to revive crispness without sogginess.
Q9: Can I experiment with different fillings or variations?
A9: Definitely! While classic pain au chocolat features dark chocolate, you can try white chocolate, almond paste, or even a sprinkle of cinnamon inside. just remember, the delicate lamination process is key-variations in dough or filling texture can affect the final pastry.
Q10: What’s the biggest tip for beginners trying this recipe for the first time?
A10: Be patient and don’t rush the chilling stages. Keeping the butter cold during lamination is crucial for flaky layers. Also,don’t be discouraged if your first batch isn’t perfect-lamination is a tricky technique that improves with practice!
Mastering pain au chocolat might seem daunting,but with this step-by-step guide and a dash of creativity,you’ll soon be filling your kitchen with the irresistible scent of fresh French pastry. Bon appétit!
Wrapping Up
As you close the final chapter on your pain au chocolat adventure,remember that mastering this classic French pastry is as much about patience and precision as it is about passion. With each fold of dough and careful layering of chocolate,you’re not just baking-you’re crafting a little piece of Parisian tradition right in your own kitchen. So,whether it’s a leisurely weekend treat or a special occasion indulgence,let your newfound skills elevate your mornings and delight your taste buds. Embrace the art, savor the process, and soon enough, the warm, flaky, chocolate-filled delights will be your signature masterpiece. Bon appétit!